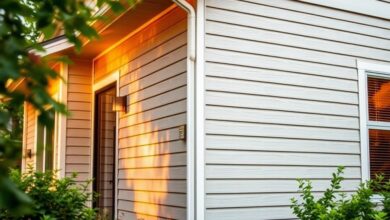
Keeping your home’s exterior in good shape is key for looks and saving energy. Insulated siding helps a lot with energy costs and keeps your home safe from the weather. But, it can get damaged over time, making it less effective.
This DIY guide will show you how to spot and fix common problems with your insulated siding. By using these repair tips, you can avoid expensive professional fixes and keep your home strong.


If you see cracks, gaps, or other damage, this guide will help you fix it. With these easy steps, you can make your home’s outside look great again. And you’ll get to enjoy the energy-saving benefits of insulated siding.
Key Takeaways
- Identify common issues with insulated siding
- Learn simple DIY repair techniques
- Save money on professional repairs
- Maintain your home’s energy efficiency
- Restore your home’s exterior integrity
Understanding Insulated Siding and Common Issues
Insulated siding’s performance depends on its condition. It’s key to spot damage signs. This siding type is chosen for its energy-saving and lasting qualities. Yet, it faces various damage types.
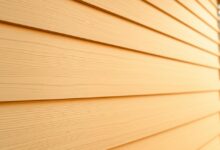
What Makes Insulated Siding Different
Insulated siding stands out because it has an insulation layer. This layer boosts energy efficiency by cutting down heat transfer. It keeps your home’s temperature steady and lowers energy bills. The insulation is between the siding and the house wall, blocking cold and heat.
Identifying Common Damage Types
Insulated siding can face physical damage and moisture issues. Spotting these early is key for siding repair guide success.
Physical Damage Signs
Physical damage shows as cracks, dents, or broken panels. Regularly check your siding for these signs. Damage can harm insulation and the siding’s strength. Causes include debris hits, harsh weather, and house settling.
Moisture and Insulation Problems
Moisture can also harm insulated siding. It can cause mold, insulation loss, and structural harm. Look for warping, color changes, and higher energy bills as signs.
Essential Tools and Materials for Insulated Siding Repair
For a DIY insulated siding repair, you need the right tools and materials. Before starting, make sure you have everything you need. This will help you do the job well.
Must-Have Tools for DIY Repairs
Having the right tools is key for a siding repair. You’ll need a utility knife for cutting, a pry bar for removing panels, and a hammer for tapping. A level ensures your repairs are straight, and a tape measure helps you cut siding correctly. Always wear gloves and safety glasses to stay safe.
Recommended Materials and Replacement Parts
Choosing the right materials is important for siding maintenance. You need to pick the right siding and insulation.
Matching Your Existing Siding
To keep your home looking good, match your siding as closely as you can. Take a sample to a store to find a match. Look at color, texture, and material for a perfect repair.
Insulation Materials
When replacing insulation, pick materials that match the original. Foam board and fiberglass batts are common. Good insulation saves energy and prevents damage. Make sure it fits your siding and local codes.
With the right tools and materials, you’re ready to fix your insulated siding.
Step-by-Step Insulated Siding Repair Tips
Homeowners can fix insulated siding repairs with confidence. This guide will help you with cracks, water damage, or damaged panels. Follow these steps to get it done right.
Repairing Cracks and Small Holes
Fixing cracks and small holes is easy with the right tools. First, clean the area well. Then, use a caulk or sealant made for outside use. For holes, fill them with a patching compound before sealing.
Addressing Water Damage and Mold
Water damage and mold need quick action. Find and fix the water leak first. Then, clean the area with bleach and water to remove mold. Let it dry before applying a waterproof sealant.
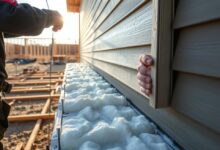
Replacing Damaged Panels
Replacing panels is a bit more work but doable. Start by removing the damaged section.
Removing Damaged Sections
Pry off the damaged panel carefully. Note how it was installed for easier reinstallation. Remove any nails or debris left.
Installing New Panels Properly
Place the new panel level and secure it with nails. Seal gaps around it with caulk to stop water from getting in.
| Repair Task | Materials Needed | Tips |
|---|---|---|
| Repairing Cracks | Caulk or sealant | Clean area before applying |
| Addressing Water Damage | Bleach, water, sealant | Identify and fix leak source |
| Replacing Panels | New panel, nails, caulk | Ensure new panel is level |
Sealing and Weatherproofing Repairs
After repairs, seal and weatherproof the area. Use a good exterior sealant around all repairs. Make sure all edges and joints are sealed well.
By using these insulated siding repair tips, homeowners can keep their home in good shape. Regular checks and quick fixes will make your siding last longer.
When to DIY vs. Call a Professional
Choosing between DIY and professional help for insulated siding repair depends on a few things. These include the damage’s extent and your DIY comfort level.
Projects Suitable for Homeowners
Homeowners with basic DIY skills can handle many minor repairs. For example, repairing small cracks and holes is easy with the right tools and a siding repair guide. Replacing a single damaged panel is also doable if you have the correct part and follow the manufacturer’s guide.
These simple repairs can save you money and teach you new skills. But, it’s important to know your limits. If you’re unsure about a repair, don’t hesitate to ask for help.
Signs You Need Professional Help
While DIY repairs can save money, there are times when you should call a pro. If you see extensive structural damage or complex insulation issues, it’s time to get expert advice.
Extensive Structural Damage
Widespread damage to your insulated siding or issues with your home’s structure need a pro. They have the skills and tools to fix complex problems safely and well.
Complex Insulation Issues
Insulation problems like moisture or damaged insulation need special knowledge. A professional can figure out the issue and fix it, keeping your home energy-efficient and safe.
In summary, while many homeowner siding repair tasks are DIY-friendly, knowing when to call a pro is key. Understanding your limits and knowing when to seek help ensures your insulated siding repair is done right and safely.
Conclusion
Keeping your insulated siding in good shape is key to its long life and performance. By using the DIY repair tips from this guide, homeowners can fix common problems. This ensures their siding stays in top condition.
Regular checks for damage, clean gutters, and trimming trees are important. These steps help protect your siding from water and tree damage. Doing these things can make your siding last longer and keep your home energy-efficient.
If you face issues like cracks or water damage, this guide has solutions. It shows a clear way to repair and maintain your siding. With the right tools and materials, you can fix problems and keep your siding looking great.